Category Archives: Original Artwork

“Out Of The Storm”

Well, it’s been a while and I’m almost ashamed to say that I really haven’t done any charcoal work so far this year. Between several leather projects, studying for professional certifications, and the day to day grind, I just haven’t had the opportunity to sit down and really focus. That said though, I have been working in my head making plans.

Although I’m pretty detail oriented and live for it in my work, I’m often quite jealous of people who are able to just let go and not worry about obsessing over details. I have a couple of friends in the artist community who really excel at that style of work, one of which (fellow Nitram user Vitya Malirsh) is quite adept at atmosphere and beautiful landscape work without using detail.

Looking at some of these works I was reminded about how interesting I find the shape and value transitions in cloud formations during and after a storm. Even though I wasn’t working on anything in particular, I just knew that I had to try my hand at creating a piece that’s free of detail and really let the beauty of the clouds show through. That’s when I started pulling out my camera every time I saw an interesting cloud formation, just hoping that sometime I’d get the chance to sit down and “let loose”.

After going through a pretty stressful year, I began really feeling the need to work on something just for fun. No commissions, no gallery work, just the kind of thing that would be for me and me alone that wouldn’t matter if I failed (like many artists, I have a problem with “failed” pieces). As luck would have it, I ended up being in a situation where I would be spending most of the day waiting in a car with nothing to do. I could have spent that time reading or scrolling through social media, but instead I decided it would be the perfect time to try my hand at some cloudscapes. People paint outdoors all the time. Why can’t I leave the comfort zone of my studio setup to work on one piece that “doesn’t matter?”

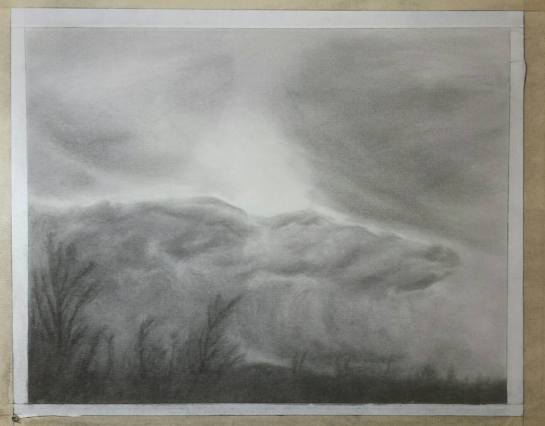
After scrolling through my gathered images, I decided this would be a really good one to start with. It really pulls together a lot of what I wanted to play with but also offered me enough challenge with those trees (another thing I’ve never really worked on before) that I would be sure to feel like I let out some pent up creative energy. This image was taken sometime over the summer outside Lewis-Clark State College in Lewiston, ID. It’s a tree line I look at nearly everyday as I take an afternoon walk and there are frequently interesting formations like this on the horizon.

ots-ref_allen-mewes

Knowing that I’d be doing the vast majority of the work in my car, I decided to take a few moments to rough out some basic shapes and get some undertone placed with charcoal powder. The most important thing here was to save the pure white center so that I could gradually soften it later without having to add white to the mix.

am-ots_000

Once I got started “on location” I honestly had a little bit of trouble figuring out exactly how to approach it. Normally when I’m working on something representational of anatomical I’ll have clear objects to block in and measure. Since I wasn’t actually measuring anything here it was a little difficult to decide where to start. But, since I had the central focus oriented first and some of the basic features of the scene lined out, I decided the first thing to do would be to get some horribly ugly marks on the paper. I knew I would do “something” with the tree line, but hadn’t decided what yet. So I grabbed my cheap willow charcoal that can easily be dusted off and scratched out a value reference for the trees. Nothing spectacular, just something to keep the darker values in site as I built up the cloud formations.

From there I was able to start building up some of the cloud formations. Initially I had actually planned on using mostly brushes and cotton balls. However, once I got started, I found the majority of the work was going best with a blending stump and eraser. It was still a little awkward getting used to “scribbling” tone on in order to blend it around, but it quickly began to feel a lot more relaxed.

ots_001

By the end of the day working in the car, I was able to get the vast majority of it complete, leaving only some touch up cloud work to do and then figure out how I was going to handle the tree line.

ots_01

After studying the photo above quite a bit, I decided that the lower half of the left formation didn’t quite flow right. Something didn’t feel right and I really wanted to emphasize the drama quite a bit. Granted, based on my viewing angle of the reference while working on it, I had actually missed the true shape according to what was really there. But, I wanted to create and interpret, not just copy a photo, so I really didn’t mind. It did need address though, so I came back and rounded out some of those lines back in the studio while also mixing up some of the other values to build more interest.

When it came time to tackle the tree line, I had quite the decision to make. I really didn’t want to do a detailed drawing, but I also wanted it to look like there were trees there and on the horizon. Once again, the need to start was somewhat paralyzing and I couldn’t quite figure out what to do. That’s when the marathon of Bob Ross I had watched a few weeks earlier popped into my head!!! Why don’t I just make a line for a trunk and call it a happy tree that needs friends? One thing Bob was a master at was not getting caught up in the little stuff that doesn’t matter. So, that’s what I did. one trunk followed by several more in the general location of what was in the photo, but not quite the same. I also decided to make a few of them curve and point toward the center light to guide the eye back to the clouds. In the end I’m quite happy with how they came out looking like trees, but not being detailed trees.

In the end the entire process accomplished exactly what I had wanted. I came away feeling quite successful in learning the basics of a technique I’d admired for a while and managed to do it without obsessing at all. It’s pretty refreshing to put out something that I would consider a finished piece while just allowing the piece to come together. I’ll definitely be doing more work like this in the future, and may even incorporate some of it into my other work.

I haven’t quite had a chance to seal it up and take print quality photos yet, but once I do they will be available for purchase on my Saatchi Art page at saatchiart.com/allenmewes

allenmewes-ots00


“Limitless” – Federation Of Canadian Artists

I’m very excited to announce that my latest charcoal piece, “Laocoon’s Regret” was accepted into the Limitless exhibition with the Federation of Canadian Artists. This was an open call for all international artists, with all entry fees going toward the establishment of a scholarship to one lucky student in a college visual arts program.

You can view my piece and the others that were selected at http://www.artists.ca between June 1st and August 31st – and you don’t even have to travel to Canada to see it!!! It is posted for sale through the show at $730 USD in an unframed state. But, if you would like to purchase it framed, I have all of the materials on hand to do it. Just let me know if you’re the one who purchases it and we’ll make arrangements. I just wasn’t able to get it framed up before submitting the piece to jury. And don’t forget that prints are always available on my Saatchi Art page at saatchiart.com/allenmewes

I’m extremely grateful to have been selected by a group who promotes other artists to succeed. Hopefully this is the sign of many more opportunities like this to come. If you haven’t seen the work that went into creating this piece, I created several additional blog posts throughout the process.

Laocoon's Regret

Laocoon’s Regret

Laocoon Group, Work In Progress #2

Well, in my last post I said things were going a little slow…. let’s say things haven’t changed much. But, there has been some good progress made on our Laocoon piece, even if it’s not exactly fast.

When we left off before I was still blocking in the main shapes to make sure all of my proportions were correct. I got most of the figures blocked in, with a little bit of work to do on the serpents, but I ended up reaching a point where I had to start making visible progress in order to get things moving. So, I ended up leaving some of the central action for a later time since I’ll be working top left down to bottom right (I’m right handed). That leaves me a little time to start rendering some forms and get a feel for where we’re going. Sometimes my brain just needs that change in scenery in order to refresh and build momentum. In this shot you’ll also see that I’ve printed out some copies of the previous studies to remind myself of what I did with different portions previously.

amewes_Laocoon_BlockIn_02

Once I finished mapping out some details in Laocoon’s face I decided it would be a good time to start rendering some of his anatomy. That allows me to get most of his arm done, his facial features and hair, and a lot of his upper torso. Really that’s a large portion of the work to be done and should set me pretty far ahead. In this shot I’ve just wrapped up all of his facial features and started rendering the arm with some base values. I’ll come back and darken things up once I have more of the piece going.

amewes_Laocoon_Render01

His armpit here is actually one of the challenges for me since there was originally another length of the serpent wrapping his arm right there, which is now broken off. If you remember from previous posts, I’m recreating some portions in my own vision while trying to humanize the figure a little more than the original. Since the reference images of the statue don’t include the muscle structure right there, I had to bring out my anatomy mirror. I actually took this photo as a joke to show that I’m too tall, but it shows a method that’s important for determining some muscular forms – the anatomy reference we all carry around every day. This is also one of the few pictures that exist of me at work – “Limited Edition”???
Anatomy Mirror

As you can see, I still have quite a bit of work to wrap up before my December 31st deadline, but I think I can make it. If you’re in need of any last minute gifts for the Holidays, you can always order a print for your loved ones from my Saatchi Art profile. You have your choice of sizes and materials at the click of a button. Just head over to saatchiart/allenmewes to see the current listings available.

Laocoon Group, Work In Progress #1

With the holiday season in full force, I’ve been having some troubles dedicating as much time as I’d like to the final piece for my Laocoon series. That said, I have been able to get started on a basic block in of the major shapes, though it’s not coming along nearly as fast as I’d like.

Still fine tuning my sight-size work, I have the reference photo I’m working off of blown up to about the same size that I’ll be working on. I’m adjusting the composition a little bit on the final piece though. As you can see, I’m a little short on wall space in my studio, so I had to create a wall out of some boxes. Sometimes you just do what you have to do in order to get the job done.

amewes_Laocoon_Reference

Since there are so many complex forms in this piece that are interwoven together, I’m taking a great deal of patience to make sure I have every line plotted correctly. It takes up more time now, but having the accurate block in will prevent any little mistakes from multiplying and throwing off the rest of the composition down the road. Once I get the entire piece blocked in like this, I’ll be able to start focusing in on the individual figures and properly developing their forms.

amewes_Laocoon_BlockIn_01

That’s all the updates I have on it for now. Remember, if you’re interested in prints of the previous study pieces, you can find those and other works on my Saatchi Art profile at saatchiart.com/allenmewes. And don’t forget to pass the word along if you know anybody else who would love to see these pieces. Until next time, I hope everybody has a wonderful, stress free holiday season!

Recreating Laocoon, Part 4 – Laocoon

This is the wrap up of our study pieces of the Laocoon Group. If you haven’t read the previous entries regarding Laocoon’s sons and why I chose this piece,  please be sure to head there and take a look. There is a lot of detail in those posts that I’ll try not to repeat too much here. You can view them by going to the blog menu, or by clicking these links: Part 1, Part 2, Part 3

OK, let’s get started on Laocoon himself. I want to start with one of those lesser known facts about the sculpture. While I was doing my research on the piece I read an interesting tidbit about an analysis that was done on Laocoon’s eyes. They actually found that his eyes were originally painted to represent an old man with cataracts. It’s interesting, but it also leads me to wonder what exactly led them to such a specific conclusion. But, I decided to go with it, which is why you won’t see any pupils in the finished drawing.

Remember that I’m focusing on specific elements of these pieces to draw the viewer in. In this one, the emphasis is clearly on his face and the pain he’s feeling, both as a result of the battle with the serpents, but also pain that the Gods would do this to their servant. So that’s why you’ll see the most detail for my block in drawing in his face. I’ve still kept the hair and beard quite light as a spacial reference. Also, notice that I’ve still used varying line values for different parts of his body that will end up with different value ranges in the end.

amewes_laocoon_wip01

For the second shot, you’ll see that I’ve completed most of the light undertones on his body as a point of reference for value while I’m building out his face. I’m also adding basic value forms to his hair and beard at this time. I do this for 2 reasons. One is to get rid of the light space that throws me off at times, but the other is because a beard like his is full of layers with various values. I like to portray that same effect by applying different layers in the beard and hair throughout the time I’m working on the piece.

amewes_laocoon_wip02

At this stage you can see that I’ve added most of the value to his anatomy, with just a few things left to darken up toward the end. You can also see my first run and erasing and blending more of the beard layers. But, the main work on this portion is in his face. There were some aspects of his features that I had to create because of the lack of clarity in a few spots (nothing like yesterday’s problems though), such as his left eye (viewer right) and some of the details on his lips. Also, none of these figures have fully defined teeth, so I’ve also had to create those based on their expressions.

amewes_laocoon_wip03

In this one you can see that I’ve finished out most of the rendering on his face, with only a few little details to adjust. I’ve also got most of the beard filled in, though it still has a little bit of a spaghetti feel to it. I’m essentially ready to finish out his hair at this point and go back to the body to finalize some of those values.  They basically just need to be darkened up to more closely match the deep shadows on his neck and shoulder.

amewes_laocoon_wip04

After finishing up the values on his body to really make the shoulder structure pop out, I made a few finishing touches to the beard and hair, trying to maintain the curls and the layers that were built up. With the completion of this one, I’ll be moving on to the final piece featuring all three figures. This will be the largest charcoal piece I’ve done and it should prove to be quite the fun challenge. Remember that this and other pieces are currently available to purchase as prints on my Saatchi Art profile at saatchiart.com/allenmewes. I actually reworked a few of the photos today to make sure that they’re all crisp and perfect to adorn your wall. If you’d like to wait for the originals, they’ll be available for purchase some time in March of next year.

Laocoon, Study For Laocoon And His Sons

Laocoon, Study For Laocoon And His Sons

Recreating Laocoon, Part 3 – Antiphas

We’re now on part 3 of our in progress series of the Laocoon group, picking up with Antiphas, the second of Laocoon’s sons. If you missed our previous discussions, be sure to go check out Part 2.

Though it’s not apparent from the selected composition here, there are some versions of the Laocoon story which state that Antiphas was able to escape the serpents. The sculpture does seem to imply that by the fact that he has nearly escaped the serpent’s grasp. A lot of that is shown in the missing pieces from this composition where he’s pulling his foot away from the serpent. Even though it’s not part of this composition, I felt it’s important enough to mention because it does play to what I feel are the critical aspects of the scene. There’s a lot of tension in his abdomen here caused by his struggle to pull his foot free. The other emphasis here is on his face and the feeling of anguish as he looks to his father for help. So, those two elements are actually where I spent the most time on this study, and unfortunately had the most struggles (to the point of almost throwing it away and starting over).

If you read yesterday’s post (if you haven’t, I’ll wait…..), you’ll remember that I mentioned the lack of clarity in the reference photo getting the best of me. The problem is that from a normal viewing position, it actually looks pretty decent. But, once I got started trying to find the details that establish his face I realized that they just weren’t clear enough to decipher what was shadow and what was actually form. In the first few progress shots you’ll see that his facial features really don’t look right at all. Eventually I found some photos of a relatively similar angle that I was able to enlarge in order to cross reference and then complete them better for the pose I’m working on here. Unfortunately I don’t have any images showing this stage because I was quite frustrated with the way it was looking and found myself going back and forth between continuing or starting over.

amewes_Antiphas_wip-Setup

The last post went into a lot of the detail regarding my processes, so I’ll spare you from a repeat here. I did start out with some rough hatching for where my darker areas would be as a point of reference. In the end they didn’t really matter, and a lot of this anatomy wasn’t quite as accurate as it should have been at this point. Essentially, I had basically set myself up for failure from the start by not taking as much time as I normally would in the block-in stage.


amewes_Antiphas_wip01

Here I’ve started laying in some of the value working upper left down to keep my hand from smearing any of my beginning layout lines. But, I’ve also started working on his face just a little bit. I knew from the start that it wasn’t quite right and decided to see how far I could take it as soon as possible. That way I wouldn’t get through the entire piece before deciding I had to start over.
amewes_Antiphas_wip02

Still hopeful that I might save his face, I dug up a little bit of courage to start building out the anatomy in his torso. Since I’m still learning what all those little bumps and mounds are under the skin, I actually spent quite a bit of time studying some different anatomy books, as well as pictures of body builders, in order to determine what portions were bone and what was muscle. It’s not highly evident here, but I had also begun adjusting some lines where his body intersects with the serpent. Some things just didn’t look right no matter how they measured up against the reference. I also began building out some of the darkest values to the right as a point of comparison for the rest of the piece.

amewes_Antiphas_wip03

Remember that the contractions in his abdomen are among the critical features that I previously decided on. Maintaining my faith that I could salvage his face, I moved on to that first important feature. The other reason for that is to ensure I have a good value range to reference when I work on his face. Otherwise the values may not be quite right for drawing the attention where I want it. Another note on his abdomen that’s worth mentioning. On the sculpture in the Vatican there was actually a chunk of his lower abdomen broken off at some point and then re-attached. If you look closely at the reference photo you may see a darker line to the left of the center. I was pretty certain that was a crack in the sculpture at first, but had to go look to be sure. After studying several different images I was able to find one that clearly showed the damage I was looking at.

amewes_Antiphas_wip04

By this point I had clearly salvaged his face by finding more reference photos that allowed me to build out his features more clearly. Remember that we’re dealing with an extremely old sculpture. Usually eyes weren’t completely rendered on sculptures such as this and were instead painted on. That leaves us poor folks in the future quite a bit to determine in regards to the emotion they hold. I know from the angles that he’s in a deep stare towards his father, so I attempted to portray quite a bit of pain in the eyes to go along with the grimace in his mouth. I also decided to go with some darker values here to create more contrast and set his face further apart from the rest of his body.

amewes_Antiphas_wip05

And here’s the final outcome. If you saw yesterday’s post, you’ll see my thoughts on the hair and why I went the way I did here. I also spent a little more time working on the drapery here. It’s another one I’ve been trying to study a lot of. There are entire books written about the physics of why drapery takes the shape it does in different circumstances, and I’ve been reading them all. The other thing I should point out is what’s going on under the drapes. Failing to go back and reference other angles (did I mention setting myself up for failure from the start?), I stared at that spot in the reference for quite some time trying to figure out what the change in values was representing. It took me a while before I decided that it was his arm, which was confirmed once again by viewing other images. I added more contrast to the area here in order to save the viewer from experiencing that same confusion.

amewes_Antiphas_wip06_complete

All in all this was a fairly common adventure for me being torn between scrapping it and moving forward. I think all too often both fans and the artists themselves forget how many things can go wrong in the process. We had our challenges here, but everything came out in the end. Talking about them again in this post actually reiterates everything I did wrong to cause those problems, so maybe I’ll remember to stop it next time!! Since we’re finished with the sons, that means we only have one more study piece to go. Check back tomorrow to see our main figure, Laocoon, come to life. And remember, this and other pieces are available for to purchase as prints at my Saatchi Art page, saatchiart.com/allenmewes. I’ll actually be taking some higher resolution photos of this one this weekend so that the prints will be even more like you’re holding the real thing.


Recreating Laocoon, Part 2 – Thymbraeus

This one is a little long, so you may want to refill your coffee real quick and get cozy. You can click any of the thumbnails for a larger image if you’re having troubles seeing them. In yesterday’s post I gave a quick summary of the overall project we’re working on here, as well as some brief history behind the scene. If you haven’t checked it out yet, you can view it here in Part 1. For the first study of the group we’ll be working on Thymbraeus, the youngest of Laocoon’s sons and the first of them to die at the hands of the Gods.

At the time of starting this piece, I hadn’t really worked on anything in a while, so I wanted to start with the “easiest” figure of the group (that’s such a relative term) in order to warm up. While studying the entire sculpture and developing my plan I felt that Thymbraeus’ didn’t have quite as much definition in his anatomy and the angle I chose puts less emphasis on his face. That made it the perfect spot to begin my study since I’m still working on learning a lot of the underlying anatomy. But, with so little going on there, we’re still left with deciding what the most important part of his image is. Where is all of the tension? What portion makes the viewer feel the struggle that’s happening as the young man fails in the fight for his life? With his body mostly limp we can see that he’s in the process of using his last bit of life in an attempt to force the serpent away. That puts the critical point of this scene right there at the meeting of his hand and the serpent’s head. Ok, now we have a plan in mind for where this piece is going!!

Now that we know where we’re going, it’s time to get setup for success (or failure at times, it all starts the same). I’ve enlarged our subject to the size that I want to work on and made sure that I’m happy with the composition. Since this is a study piece, my focus is on setting up for accuracy. That means I have to account for anything that might throw off my vision, most specifically alignment. If my reference is higher/lower than the piece I’m working on by even a small amount than my eyes tend to play tricks on me and tell me it’s not accurate. To avoid that, I spend a lot of time on the setup making sure everything is level and lined up. You may also notice the lack of clarity and detail in the reference photo. More on how that came back to bite me tomorrow.

amewes_Thymbraeus_WIP01


This is the part that really takes the longest for me. Remember that emphasis on accuracy? There’s always room for slight adjustments, but if the basic structure isn’t right and the proportions are off, then the entire piece will never come together. Since this one has so many curves in it from the snake we also have to spend a lot of time making sure that those come out believable. Luckily a snake is also organic, so any small errors here can be adjusted into a representation of the serpent’s natural movements. The first thing to note here is the overall structure. If you read yesterday’s post you’ll remember that I’m attempting to transform these into a human form rather than a copy of a sculpture. Then why is he without an arm!!!? I don’t have a really good insightful answer for that. The more accurate statement is that I’m going for something between sculpture and “human”. It essentially allows me to stay true to the piece without getting too caught up in creating forms that we really don’t know anything about. For centuries there was debate regarding where the arms were originally intended to be. The day Michelangelo participated in the unearthing of the sculpture (yes, this piece is that important) he formed his own ideas that contradicted common thoughts. Time has since proven him right on the father’s arm, but we still don’t have any clues about the missing pieces of the sons. So we’ll just leave them be with all of their missing parts.

amewes_Thymbraeus_WIP02

Just a couple more notes on the above image before we move on to the next stage. Since I’m using this as a way to portray what’s happening in my head, I want to point out the reason for the different values in the lines. The majority of the differences here are based on the final outcome of the values. Most of the regions with dark contour lines are areas that will have darker values during the final rendering. That allows me to keep an eye on the overall forms as I’m building out my shading and focus my attention on the most important spots. As I stated in the beginning, I’m putting less of a priority on his facial features and head, so I’ve kept those lines fairly light here. Some of the other light portions (such as the drapery hanging off of him) are areas that I haven’t quite decided exactly what I’m doing with yet. By keeping the lines light I’m able to use them as temporary reference and go back later to refine them.

For the next stage I’ve spent a lot of time building out the value range and finding the anatomy. I tend to jump around quite a bit to avoid my natural tunnel vision. If I don’t, I’ll quite frequently find myself overworking a certain section because it just doesn’t feel right, when in reality it’s only a comparative issue since the surrounding portions aren’t there yet. So here you see I’ve built up some of the darkest areas we mentioned before and began lightly building out the muscle forms. I also further defined some of the drapery folds and began rendering his fingers. By this point we’re really starting to feel the power of the serpent squeezing on his body to render him lifeless.

amewes_Thymbraeus_WIP03

Up until now I’ve focused on overall progress images to really show how it all comes together. But, I want to take a moment to really focus in on the area that’s of the most importance to me, and the image. Throughout most of the image I mostly had to worry about relatively larger forms and value changes. But, in order to draw the eye into the central action, I had to put a lot more finesse and detail into his hand. If the hand weren’t the focal point, I probably would have left out of lot of the details and highlights in the joints and left it to the viewer’s eyes to fill in the blanks. But I really want the eyes to focus here, which is something we naturally do when there’s more detail involved. The hand isn’t quite complete at this point, and I was a little off on some of the anatomy in the bones, but you get a good idea of where it’s heading in terms of definition.

amewes_Thymbraeus_WIP04


At this point, most of the base structure is complete and I’ve pretty much determined where I’m going with everything. There are still a few values to darken up again since they’ve naturally lightened in the process of creating smooth blending. We can also see the finished detail in the hand and how it relates to the piece as a whole.  All that’s left now is to finish up the drapery and decide what to do with his hair.

amewes_Thymbraeus_WIP06

Remember that we’re shooting for an “almost human” interpretation of the sculpture. When I stop and look at many pieces in stone, I’ve always felt that there’s something a touch unnatural about the hair. Although it’s clearly full of curls, I just don’t feel it’s quite correct to portray it in groupings of curls they way it is. So, I decided to render curly hair in a form similar to what’s shown in the sculpture, yet believable as realistic hair that you’d see in life. In this image you can also see how I’ve extremely limited the details in his face and instead opted for implied features. His face really doesn’t have a whole lot to do with what’s happening in the scene, so I really wanted to avoid any emphasis there. You’ll also notice that I’ve lightened the values under his chin to maintain that separation.

amewes_Thymbraeus_WIP07_complete


And here we have it all completed with the final values. I hope this brings to light a lot of what’s happening in my head as I work. We usually don’t get the opportunity to see inside the thought processes that are happening as people create our favorite art. It’s fun to imagine that things just happen on a whim, but in reality there’s a lot of decision making going on that can both make and break a piece. I’ll try not to be quite so long winded on the rest of this series since you’ve really seen into the process on this one.  If you’re interest, this one is currently available to purchase as a print in several sizes via my Saatchi Art page at www.saatchiart.com/allenmewes

Thymbraeus, Study for Laocoon And His Sons

Thymbraeus, Study for Laocoon And His Sons