
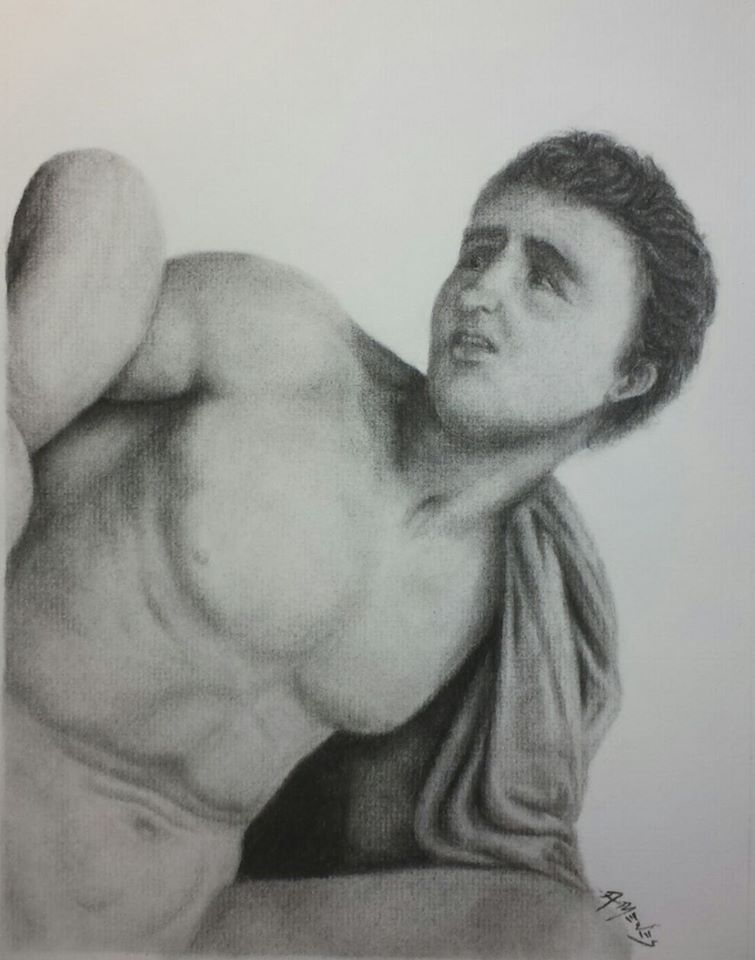
We’re now on part 3 of our in progress series of the Laocoon group, picking up with Antiphas, the second of Laocoon’s sons. If you missed our previous discussions, be sure to go check out Part 2.
Though it’s not apparent from the selected composition here, there are some versions of the Laocoon story which state that Antiphas was able to escape the serpents. The sculpture does seem to imply that by the fact that he has nearly escaped the serpent’s grasp. A lot of that is shown in the missing pieces from this composition where he’s pulling his foot away from the serpent. Even though it’s not part of this composition, I felt it’s important enough to mention because it does play to what I feel are the critical aspects of the scene. There’s a lot of tension in his abdomen here caused by his struggle to pull his foot free. The other emphasis here is on his face and the feeling of anguish as he looks to his father for help. So, those two elements are actually where I spent the most time on this study, and unfortunately had the most struggles (to the point of almost throwing it away and starting over).
If you read yesterday’s post (if you haven’t, I’ll wait…..), you’ll remember that I mentioned the lack of clarity in the reference photo getting the best of me. The problem is that from a normal viewing position, it actually looks pretty decent. But, once I got started trying to find the details that establish his face I realized that they just weren’t clear enough to decipher what was shadow and what was actually form. In the first few progress shots you’ll see that his facial features really don’t look right at all. Eventually I found some photos of a relatively similar angle that I was able to enlarge in order to cross reference and then complete them better for the pose I’m working on here. Unfortunately I don’t have any images showing this stage because I was quite frustrated with the way it was looking and found myself going back and forth between continuing or starting over.

The last post went into a lot of the detail regarding my processes, so I’ll spare you from a repeat here. I did start out with some rough hatching for where my darker areas would be as a point of reference. In the end they didn’t really matter, and a lot of this anatomy wasn’t quite as accurate as it should have been at this point. Essentially, I had basically set myself up for failure from the start by not taking as much time as I normally would in the block-in stage.

Here I’ve started laying in some of the value working upper left down to keep my hand from smearing any of my beginning layout lines. But, I’ve also started working on his face just a little bit. I knew from the start that it wasn’t quite right and decided to see how far I could take it as soon as possible. That way I wouldn’t get through the entire piece before deciding I had to start over.

Still hopeful that I might save his face, I dug up a little bit of courage to start building out the anatomy in his torso. Since I’m still learning what all those little bumps and mounds are under the skin, I actually spent quite a bit of time studying some different anatomy books, as well as pictures of body builders, in order to determine what portions were bone and what was muscle. It’s not highly evident here, but I had also begun adjusting some lines where his body intersects with the serpent. Some things just didn’t look right no matter how they measured up against the reference. I also began building out some of the darkest values to the right as a point of comparison for the rest of the piece.

Remember that the contractions in his abdomen are among the critical features that I previously decided on. Maintaining my faith that I could salvage his face, I moved on to that first important feature. The other reason for that is to ensure I have a good value range to reference when I work on his face. Otherwise the values may not be quite right for drawing the attention where I want it. Another note on his abdomen that’s worth mentioning. On the sculpture in the Vatican there was actually a chunk of his lower abdomen broken off at some point and then re-attached. If you look closely at the reference photo you may see a darker line to the left of the center. I was pretty certain that was a crack in the sculpture at first, but had to go look to be sure. After studying several different images I was able to find one that clearly showed the damage I was looking at.

By this point I had clearly salvaged his face by finding more reference photos that allowed me to build out his features more clearly. Remember that we’re dealing with an extremely old sculpture. Usually eyes weren’t completely rendered on sculptures such as this and were instead painted on. That leaves us poor folks in the future quite a bit to determine in regards to the emotion they hold. I know from the angles that he’s in a deep stare towards his father, so I attempted to portray quite a bit of pain in the eyes to go along with the grimace in his mouth. I also decided to go with some darker values here to create more contrast and set his face further apart from the rest of his body.

And here’s the final outcome. If you saw yesterday’s post, you’ll see my thoughts on the hair and why I went the way I did here. I also spent a little more time working on the drapery here. It’s another one I’ve been trying to study a lot of. There are entire books written about the physics of why drapery takes the shape it does in different circumstances, and I’ve been reading them all. The other thing I should point out is what’s going on under the drapes. Failing to go back and reference other angles (did I mention setting myself up for failure from the start?), I stared at that spot in the reference for quite some time trying to figure out what the change in values was representing. It took me a while before I decided that it was his arm, which was confirmed once again by viewing other images. I added more contrast to the area here in order to save the viewer from experiencing that same confusion.
All in all this was a fairly common adventure for me being torn between scrapping it and moving forward. I think all too often both fans and the artists themselves forget how many things can go wrong in the process. We had our challenges here, but everything came out in the end. Talking about them again in this post actually reiterates everything I did wrong to cause those problems, so maybe I’ll remember to stop it next time!! Since we’re finished with the sons, that means we only have one more study piece to go. Check back tomorrow to see our main figure, Laocoon, come to life. And remember, this and other pieces are available for to purchase as prints at my Saatchi Art page, saatchiart.com/allenmewes. I’ll actually be taking some higher resolution photos of this one this weekend so that the prints will be even more like you’re holding the real thing.
